Introduction
AI automation might sound intimidating, but with the right tools, anyone—even complete beginners—can build powerful workflows that save time and boost productivity. If you’ve been curious about automating tasks using artificial intelligence but don’t have a technical background, you’re in the right place.
In this guide, we’ll walk you through creating your first AI workflow using Zapier and ChatGPT, two beginner-friendly tools that require no coding skills. Zapier helps connect your favorite apps, while ChatGPT brings the power of AI to generate responses, summarize content, or analyze text—all automatically.
Whether you’re a freelancer, small business owner, or just looking to make your daily routine more efficient, this step-by-step tutorial will show you how to set up your first AI-powered automation in minutes. By the end, you’ll have a working example you can build on—and the confidence to explore more advanced automations.
Let’s dive into the world of no-code AI automation and unlock what’s possible with just a few clicks.
2. What You Need Before You Start
Before jumping into building your first AI workflow, it’s important to gather the basic tools you’ll need. Don’t worry—everything here is beginner-friendly, and most of it is free to start with.
1. A Zapier Account
Zapier is a no-code automation platform that connects your favorite apps—like Gmail, Google Sheets, Slack, and hundreds more. You can start with a free plan, which is perfect for testing simple workflows. Just sign up, and you’re ready to build your first “Zap” (Zapier’s term for a workflow).
2. A ChatGPT Account (OpenAI)
You’ll need access to ChatGPT, preferably with GPT-4 or GPTs enabled, as this gives you access to the most powerful AI capabilities for automation. If you’re using OpenAI’s platform, the ChatGPT Plus plan (around $20/month) gives you access to GPT-4 and custom GPTs, which work smoothly with Zapier via API or plugin.
3. A Use Case in Mind
To get the most out of this guide, think of a simple task you want to automate—for example:
- Generating email responses
- Creating social media captions
- Summarizing new form submissions
- Sending automatic replies
Having a use case helps you follow along and see real results right away.
4. A Little Curiosity
You don’t need any coding or technical experience—just a willingness to experiment and learn. The beauty of Zapier and ChatGPT is that they take care of the complex parts for you.
3. Understanding the Workflow Basics (Triggers, Actions, AI Steps)
Before you start building your first AI workflow, it’s helpful to understand the basic building blocks that make automation possible—Triggers, Actions, and AI Steps. These three components form the core of every workflow you’ll create using Zapier and ChatGPT.
Trigger: What Starts the Workflow
A trigger is the event that kicks off your automation. For example, receiving a new email, submitting a form, or adding a row in Google Sheets. Triggers tell Zapier, “Hey, something just happened—let’s start the workflow!”
Example: A new email is received in Gmail → this triggers the workflow to begin.
Action: What Happens Next
An action is what Zapier does after the trigger fires. This could be sending a message, creating a document, updating a database, or anything else that involves moving or processing data.
Example: Zapier takes the email content and sends it to ChatGPT.
AI Step: Where ChatGPT Does Its Magic
Here’s where things get exciting. Using an AI step, you can pass information from the trigger into ChatGPT, which can then:
- Generate a response
- Summarize content
- Categorize data
- Create custom outputs
Example: ChatGPT generates a summarized reply or a to-do list based on the email’s content.
These steps can be chained together to create powerful, hands-free workflows. With just a few clicks, you’ll be automating tasks that used to take hours—and the best part is, you don’t need to write a single line of code.
Next, let’s build your first AI workflow using Zapier + ChatGPT from scratch.
4. Step-by-Step: Creating Your First Workflow Using Zapier + ChatGPT
Now that you understand the basics—Triggers, Actions, and AI Steps—let’s build your first AI-powered automation from scratch using Zapier and ChatGPT. This step-by-step tutorial is designed for beginners, no coding required.
We’ll walk you through a practical, beginner-friendly use case:
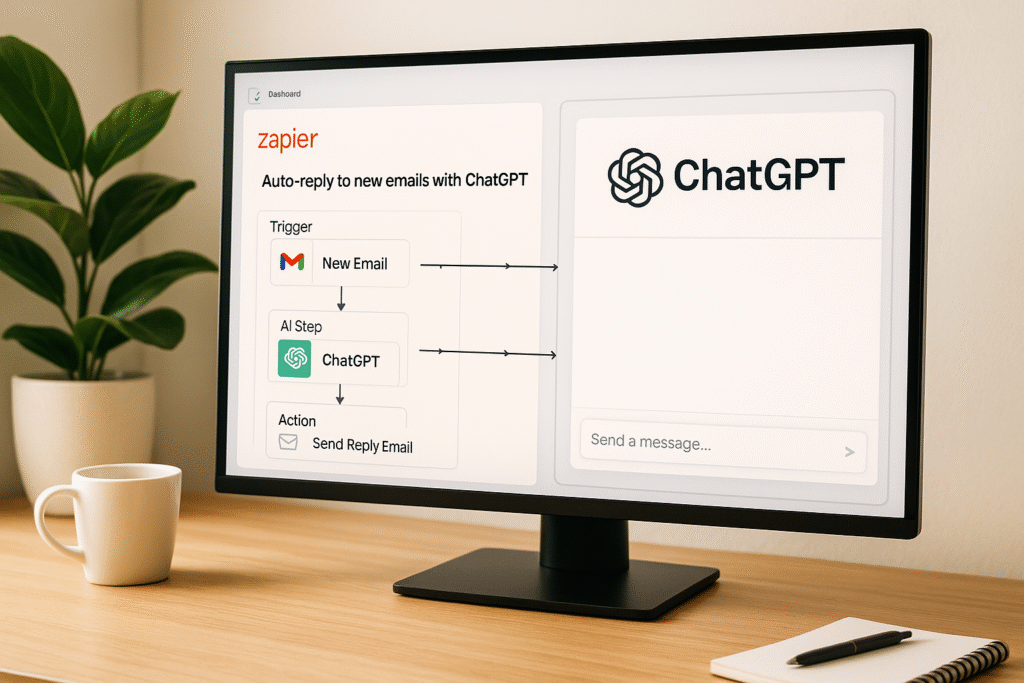
Goal: Automatically reply to new emails with an AI-generated response using ChatGPT.
Let’s get started.
Step 1: Sign in to Zapier and Create a New Zap
- Go to Zapier.com and log into your account.
- Click on the “+ Create” button and choose “Zaps”.
- Name your Zap something like “Auto Email Reply with ChatGPT” so you can easily find it later.
Step 2: Set Up the Trigger (New Email)
- In the Trigger section, search for and select Gmail.
- Choose the trigger event: New Email.
- Connect your Gmail account (Zapier will prompt you to allow permissions).
- Set any filters you want—for example, only reply to emails with certain subjects or from specific senders.
- Test the trigger to ensure Zapier can pull a recent email.
Pro Tip: You can also use apps like Typeform or Google Forms if your workflow starts with a form submission instead of an email.
Step 3: Add ChatGPT as the Action (AI Step)
Now it’s time to add some AI magic.
- Click “+” to add a new action.
- Search for OpenAI (ChatGPT) as the app.
- Choose “Send Prompt” or “Conversation with GPT-4” depending on your integration.
- Connect your OpenAI account using an API key or via plugin access (Zapier will guide you).
- In the Prompt field, write something like:
You are an AI assistant. Write a friendly and professional reply to this email:
“{{Body Plain}}”
Replace “{{Body Plain}}” with the dynamic content pulled from the Gmail trigger (Zapier shows it in a dropdown list).
- Choose your AI model—preferably GPT-4 for better response quality.
- Set temperature to around 0.7 (for balanced creativity) and max tokens to 300–500.
Step 4: Send the AI-Generated Reply via Gmail
Now let’s send the AI-generated response back to the sender.
- Click “+” to add a third step.
- Choose Gmail again, but this time select “Send Email” as the action.
- Use the “From” and “To” fields based on the original email trigger.
- For “To,” choose the sender of the original email ({{From Email}}).
- In the Body, insert the response generated by ChatGPT from the previous step.
- Add a subject (e.g., “Re: Your Recent Message”) and any other settings like a signature.
Test the Zap to make sure everything flows smoothly from trigger to reply.
Step 5: Turn On Your Zap
Once you’re satisfied with the test results, click the “Publish” button to activate your workflow.
Congratulations! You’ve just built your first AI workflow using Zapier and ChatGPT.
Bonus: Test It Live
To test your automation in the real world:
- Send a test email to your Gmail account from another address.
- Wait a few seconds.
- You should receive a custom reply written by ChatGPT—automatically.
This is a powerful way to handle inquiries, manage support messages, or even just impress your friends.
Alternative Beginner Use Cases to Try Next
Now that you’ve completed your first automation, here are a few other no-code AI workflows you can build:
- Blog Idea Generator:
- Trigger: New row in Google Sheets
- Action: ChatGPT generates blog titles based on keywords
- Output: New row with AI-generated ideas
- Form Summary Report:
- Trigger: New submission in Google Forms
- Action: ChatGPT summarizes form responses
- Output: Email or Notion page with summary
- Social Media Caption Creator:
- Trigger: Upload a photo to Dropbox or Google Drive
- Action: ChatGPT generates a caption
- Output: Add to spreadsheet or schedule post
Each of these follows the same structure: Trigger → AI Step → Action, and can be customized to suit your workflow goals.
Tips to Improve Your Workflows
- Use clear prompts: The better your instructions to ChatGPT, the better the response.
- Limit tokens: If you want shorter, faster replies, lower the token count.
- Test frequently: Always preview your outputs before going live.
- Save prompts: Reuse or refine your prompts for future automations.
- Use folders in Zapier: Organize Zaps by category or purpose (e.g., AI Zaps, Client Zaps, etc.).
By now, you should feel confident in building and running your own AI workflow—even with zero coding experience. In the next section, we’ll explore real-life beginner use cases that can inspire your next automation project.
5. Real-Life Use Cases for Beginners
Now that you’ve created your first workflow, it’s time to explore how AI automation can simplify your everyday tasks—even if you’re not tech-savvy. These beginner-friendly use cases require no coding and can be built using tools like Zapier and ChatGPT in under an hour.
1. Instant Email Summarizer
Tired of reading long emails? Set up a workflow that sends incoming emails to ChatGPT and delivers a brief summary to your phone or Slack. Perfect for busy professionals who want to stay informed without reading every word.
2. Google Forms + AI Summary
When someone fills out your contact form or survey, automatically send the responses to ChatGPT for summarization and receive a short analysis in your inbox.
3. Content Idea Generator
Trigger ChatGPT to generate blog titles or social media post ideas whenever you add a new keyword to a Google Sheet. A smart way to keep your content pipeline full.
4. Meeting Notes Generator
After a Zoom or Google Meet call, send the transcript to ChatGPT for clean, readable meeting notes you can share with your team or clients.
5. Customer Support Auto-Responder
Automatically respond to customer inquiries using AI-generated replies, keeping your inbox under control and customers satisfied.
These use cases show how accessible AI automation can be—even for non-tech users. Once you start, the possibilities grow quickly. Up next: we’ll cover some common pitfalls and how to avoid them.
6. Best Practices & Tips
As you start building more AI-powered workflows, following a few best practices can help you avoid frustration and get better results—especially as a beginner. Here are the top tips to keep in mind:
1. Start Simple, Then Scale
Don’t try to automate everything at once. Begin with one clear, manageable use case—like sending AI-generated replies to new emails. Once you’re confident, you can layer on more complexity or build multi-step workflows.
2. Write Clear, Specific Prompts
The quality of your AI results depends heavily on the instructions you give ChatGPT. Always provide clear, detailed prompts that explain exactly what you want. For example:
“Write a professional email thanking a client for their feedback and offering a 10% discount.”
3. Test Every Step
Use Zapier’s built-in testing tools to preview how data moves from one step to the next. This helps you catch issues early—like formatting errors or missing inputs—before they break your automation.
4. Label & Organize Your Zaps
Give each Zap a clear name and group them into folders (like “Client Workflows” or “Content Automation”) so you can easily manage and update them as you scale.
5. Monitor Performance
Regularly review your workflows to make sure they’re still aligned with your goals. Look for areas where you can refine prompts, improve timing, or add conditional logic.
By following these simple best practices, you’ll build more reliable, useful automations—without the headache.
7. Conclusion
Starting your AI automation journey may feel overwhelming at first, but as you’ve seen, building your first workflow with Zapier and ChatGPT is easier than you might think—no coding required. By learning how triggers, actions, and AI steps work together, you can begin automating repetitive tasks, improving productivity, and saving valuable time in your personal or professional life.
This beginner-friendly workflow is just the beginning. Whether it’s handling emails, summarizing data, generating content ideas, or enhancing customer service, the possibilities with AI automation are nearly endless. The key is to start small, stay curious, and build confidence one workflow at a time.
As you become more comfortable with these tools, you can explore more advanced integrations, add conditional logic, and even chain multiple AI models together to create smarter, more powerful systems.
The future of work is automated—and you’re now part of it.
Ready to build your next AI-powered workflow? Let your ideas flow, and let automation do the rest.